alx-project-nexus
Project Nexus Documentation
![]()
![]()
Overview
This repository documents major learnings from the ProDev Backend Engineering program. It serves as a knowledge hub for backend technologies, concepts, challenges, and best practices covered during the program.
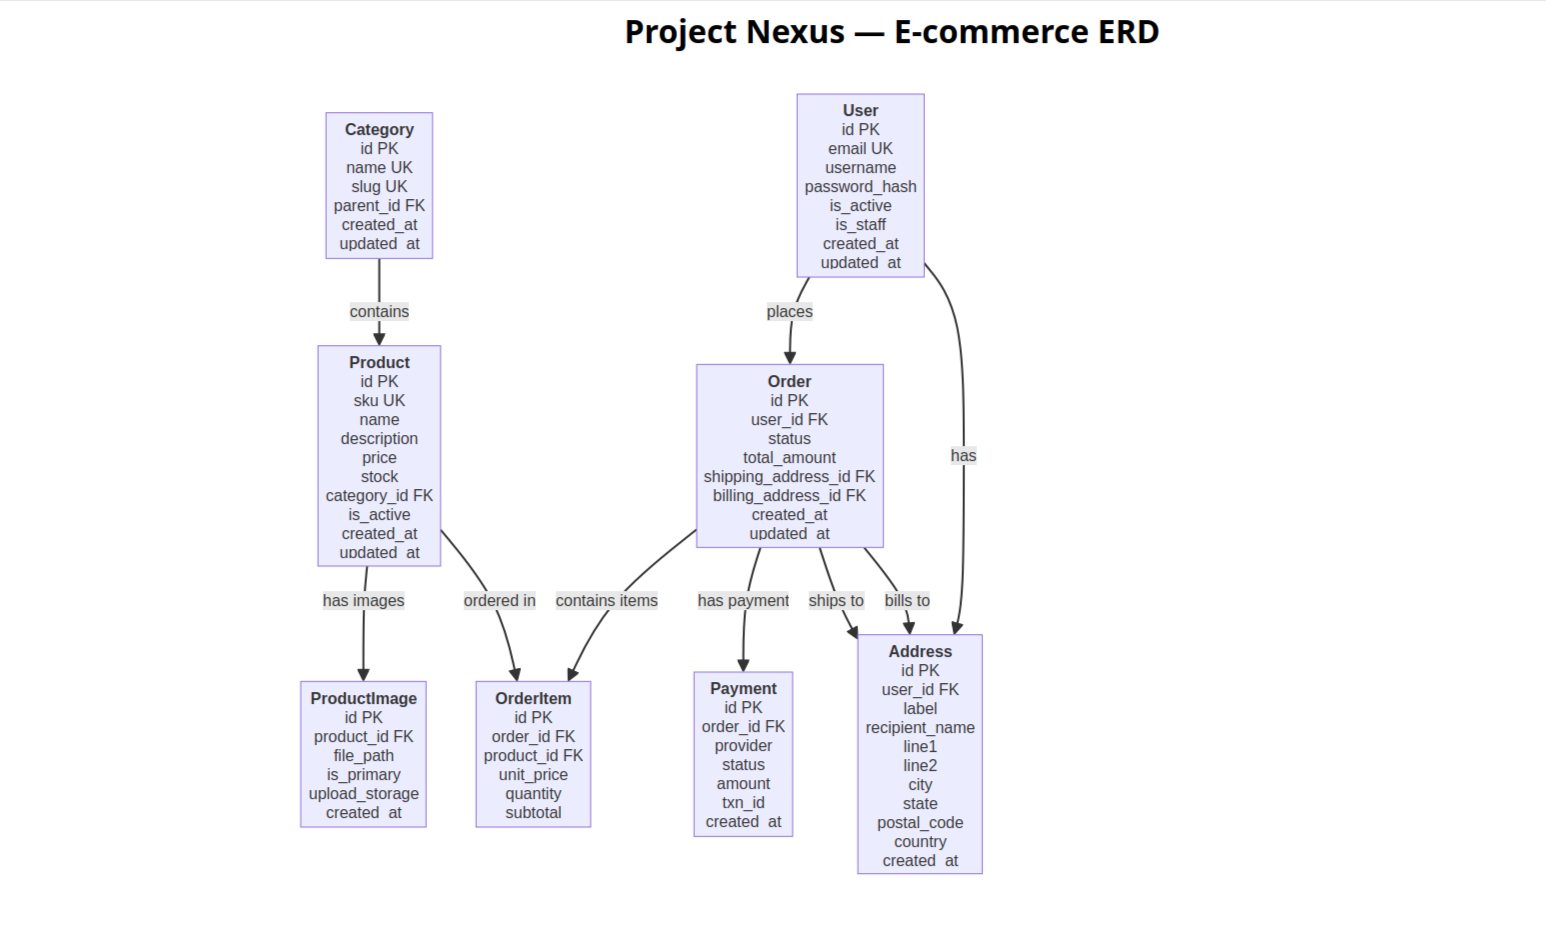
Database Schema (ERD)
The following Entity Relationship Diagram (ERD) shows the database schema for the Project Nexus e-commerce system:
Objectives
- Consolidate key learnings from the ProDev Backend Engineering program.
- Document backend technologies, concepts, challenges, and solutions.
- Provide a reference guide for current and future learners.
- Support collaboration between frontend and backend learners.
Key Technologies
- Python
- Django
- REST APIs
- GraphQL
- Docker
- CI/CD Pipelines
Backend Concepts
- Database Design
- Asynchronous Programming
- Caching Strategies
- System Design
Challenges and Solutions
- Managing long-running tasks → Solved with Celery and RabbitMQ
- Database performance issues → Solved with query optimization and indexing
- Deployment difficulties → Solved with Docker and automated CI/CD pipelines
Best Practices and Takeaways
- Write clean and modular code
- Document APIs clearly
- Use version control effectively
- Apply security measures consistently
Collaboration
This project encourages collaboration with:
- Backend learners for sharing knowledge and solving problems
- Frontend learners who will use backend endpoints
Communication and collaboration are supported through the #ProDevProjectNexus Discord channel.
Repository
GitHub Repository: alx-project-nexus
Live demo
The project is deployed and publicly available at:
https://alx-project-nexus-gkqz.onrender.com/
Open the admin at https://alx-project-nexus-gkqz.onrender.com/admin/ (use the default - (admin/password) admin credentials configured in the Render service environment variables).
Deploying to Render (quick runbook)
Follow these steps to deploy and verify the site on Render. This is the minimal, repeatable runbook we used during development.
1) Provision Managed Postgres on Render
- Create a managed Postgres instance via Render Dashboard → Databases. Note the connection string (Render provides it as a URI).
2) Add environment variables to your Render service
- In Render Dashboard → Services → your service → Environment, set the following variables (do not commit secrets to git):
- DATABASE_URL = postgresql://
: @ : / - DJANGO_SECRET_KEY = ****
- DJANGO_ALLOWED_HOSTS = alx-project-nexus-gkqz.onrender.com
- ADMIN_USERNAME / ADMIN_EMAIL / ADMIN_PASSWORD = (optional; used by scripts/create_admin_if_missing.py)
- MEDIA_URL = https://
.supabase.co/storage/v1/object/public/ / # if using Supabase public bucket - USE_S3 = 0 # make sure S3 logic is disabled unless using S3
- DATABASE_URL = postgresql://
3) Deploy and run migrations
# in your local shell (optional): set DATABASE_URL to the Render DB and run migrations
# $env:DATABASE_URL = "postgresql://..."
# .\venv\Scripts\python.exe manage.py migrate --noinput
4) Load data (fixtures)
- We recommend using the bulk loader for large JSON fixtures (faster over remote DB):
# $env:DATABASE_URL = "postgresql://..."  # Render DB
.\venv\Scripts\python.exe scripts\bulk_load_fixtures.py fixtures\catalog.utf8.json
5) Create admin (if not set via env)
# $env:DATABASE_URL = "postgresql://..."
$env:ADMIN_USERNAME = "admin"
$env:ADMIN_EMAIL = "example@email.com"
$env:ADMIN_PASSWORD = "*****"
.\venv\Scripts\python.exe scripts\create_admin_if_missing.py
6) Media: use Supabase (no AWS credit card required)
-
We include
scripts/upload_media_to_supabase.pyto uploadmediafiles/preserving paths. After uploading, setMEDIA_URLon Render to the Supabase public prefix (ends with a trailing slash):MEDIA_URL = https://
.supabase.co/storage/v1/object/public/ / -
Example upload (local):
$env:SUPABASE_URL = "https://<your-project>.supabase.co"
$env:SUPABASE_SERVICE_ROLE_KEY = "<service-role-key>"  # keep secret
.\venv\Scripts\python.exe scripts\upload_media_to_supabase.py --bucket media --local-dir mediafiles
7) Redeploy the Render service (or Restart) so environment variables take effect.
8) Verify
- Open the admin at /admin/, inspect a product — the image thumbnails should now point to your Supabase MEDIA_URL and load.
- If the admin still shows
/media/...URLs, ensureMEDIA_URLis set in the Render service environment and that you redeployed.
Rollback & Backups
- Use Render’s database backup feature (Snapshots) before running irreversible changes. If needed, restore from the snapshot via the Render dashboard.
Notes
- The repo includes
scripts/bulk_load_fixtures.pyandscripts/upload_media_to_supabase.pyto help with data + media migration. Both are intended to be run from a trusted local machine (they require DB or Supabase keys). - For production, prefer private buckets + signed URLs or a CDN (CloudFront/Cloudflare) in front of Supabase.
Getting started (local dev)
This repo contains a Django project (nexus) and a catalog app implementing the product catalog APIs.
Performance profiling
There is a small helper script at scripts/seed_and_profile.py to seed products and profile the product-list endpoint.
Run it after starting a dev server (Postgres recommended for realistic results):
& .\venv\Scripts\Activate.ps1
# Seed via Django shell (1000 products)
python manage.py shell -c "import scripts.seed_and_profile as s; s.seed(1000)"
# Or run the script which will attempt to seed then profile
python scripts/seed_and_profile.py --host http://localhost:8000 --count 1000
The script prints simple latency stats (avg/min/max) for multiple iterations.
python -m venv venv; .\venv\Scripts\Activate.ps1
pip install -r requirements.txt
- Run migrations and start the dev server (uses SQLite by default; to use PostgreSQL set
POSTGRES_HOST,POSTGRES_DB,POSTGRES_USER,POSTGRES_PASSWORD,POSTGRES_PORTin a.envfile):
python manage.py migrate
python manage.py runserver
API docs (Swagger UI) will be available at http://127.0.0.1:8000/api/docs/.
Seeding the database (local dev)
- Activate your virtualenv and install deps:
python -m venv venv; .\venv\Scripts\Activate.ps1
pip install -r requirements.txt
- Run the seed command to populate sample data:
python manage.py seed
Docker Compose (Postgres + Django)
Start services with Docker Compose (requires Docker):
docker compose up --build
The Django app will run at http://127.0.0.1:8000 and Postgres at localhost:5432.
CI Secrets
This repository expects database and secret values to be provided via GitHub Actions secrets for CI jobs. Set the following in Settings → Secrets → Actions for the repository:
POSTGRES_PASSWORD— password for the CI Postgres serviceDJANGO_SECRET_KEY— Django secret key for CI (use a random 50+ character value)
Rotation guidance
If any secret was accidentally committed, rotate it immediately:
- Generate a new secret value (DB password, API key, etc.).
- Update the service (rotate DB user/password in your Postgres host or managed DB).
- Update the corresponding GitHub Actions secret value.
- Re-run CI to ensure jobs succeed with the new secret.
- Optionally, remove the old value from git history using
git filter-repoor BFG (coordinate with collaborators). Always rotate credentials even after history rewrite.
Docker build notes
- A
Dockerfileand.dockerignoreare included to build the web image. - To build locally run (requires Docker):
docker compose build web
docker compose up web
- If you see a connection error when building, ensure Docker Desktop or the Docker daemon is running.
Profiling with Docker Compose
After starting the stack with docker compose up --build, seed the database and run the profiling script from within the web container or from your host targeting the running server. Example (host):
# wait for migrations to finish, then on host
python scripts/seed_and_profile.py --host http://localhost:8000 --count 1000
Integration tests & CI
A minimal integration smoke test is included at tests/integration/test_smoke_db.py. It verifies the database connection and that a health endpoint responds.
Run the smoke tests locally (after migrations):
python manage.py migrate
python -m pytest tests/integration/test_smoke_db.py
To run the integration workflow on GitHub Actions, ensure the following repository secrets are set in Settings → Secrets → Actions:
POSTGRES_PASSWORDDJANGO_SECRET_KEY
You can trigger the workflow manually from the Actions tab (workflow_dispatch) or by pushing changes to the branch.
Media storage (optional: Amazon S3)
This project supports storing uploaded media (product images) either on local disk in development or on Amazon S3 in production via django-storages.
Quick setup (development - local media):
- Ensure
MEDIA_ROOTandMEDIA_URLare set (already configured innexus/settings.py). - During development run the dev server; uploaded files will be stored under
mediafiles/.
Quick setup (production - S3):
- Install dependencies:
pip install boto3 django-storages
- Set the following environment variables in your deployment environment:
USE_S3=1# enable S3-backed mediaAWS_S3_BUCKET_NAME— the S3 bucket name for mediaAWS_ACCESS_KEY_ID— IAM access key IDAWS_SECRET_ACCESS_KEY— IAM secret access keyAWS_S3_REGION_NAME— AWS region (optional)AWS_S3_CUSTOM_DOMAIN— optional custom domain for your bucket
- Confirm
DEFAULT_FILE_STORAGEusesstorages.backends.s3boto3.S3Boto3StoragewhenUSE_S3=1(this is handled bynexus/settings.py).
Security and considerations
- Use a restricted IAM user with only the permissions required for S3 PutObject/GetObject/ListBucket on the media bucket.
- Use an object lifecycle and bucket policy to control public access if needed.
- Consider using a CDN (CloudFront) in front of the S3 bucket for improved performance and caching.
Example IAM policy (least privilege)
{
  "Version": "2012-10-17",
  "Statement": [
    {
      "Sid": "AllowS3AccessForMediaBucket",
      "Effect": "Allow",
      "Action": [
        "s3:PutObject",
        "s3:GetObject",
        "s3:DeleteObject",
        "s3:ListBucket"
      ],
      "Resource": [
        "arn:aws:s3:::your-media-bucket",
        "arn:aws:s3:::your-media-bucket/*"
      ]
    }
  ]
}
Notes:
- Replace
your-media-bucketwith the intended S3 bucket name. - If using CloudFront, prefer to restrict bucket access via an Origin Access Identity (OAI) or Origin Access Control (OAC) instead of making the bucket publicly readable.
- Do not store credentials in the repository; use secrets managers or environment variables.
Deployment checklist for S3
- Create a dedicated S3 bucket for media.
- Configure bucket policy to block public access unless intentionally serving public assets.
- Create an IAM user or role scoped to the bucket using the policy above.
- Configure
USE_S3=1and provideAWS_*env vars in the deployment environment. - If using CloudFront, use a custom domain and set
AWS_S3_CUSTOM_DOMAINto the distribution domain.
Verify
- After deployment, upload a product image via the API and confirm the file appears in the S3 bucket and that the
imagefield in API responses contains the expected URL.
API documentation publishing
This repository generates and publishes OpenAPI documentation to GitHub Pages on pushes to main.
- The workflow
/.github/workflows/publish-openapi.ymlbuilds the OpenAPI JSON usingdrf-spectacularand bundles it withredoc-cliinto a singleindex.html. - By default the workflow uses
GITHUB_TOKENto publish pages. To publish from a different account or with more permissions, setPAGES_PATsecret.
API docs (published)
- Live API documentation (Redoc) is published to GitHub Pages:
- https://enyasystem.github.io/alx-project-nexus/
- To regenerate locally:
python manage.py spectacular --file openapi.json
# bundle with redoc-cli (requires Node/npm)
npx redoc-cli bundle openapi.json -o openapi.html
# open openapi.html in your browser
View docs
- After a successful deployment, pages will be available at
https://<your-github-username>.github.io/alx-project-nexus/(replace with the repository owner if needed).
Local preview
- You can generate the OpenAPI JSON and bundle it locally:
python manage.py spectacular --file openapi.json
npm install -g redoc-cli
npx redoc-cli bundle openapi.json -o openapi.html
# open openapi.html in your browser
Migrations included in this repository
- The repository includes the Django migration files required to set up the database schema for the
catalogapp. Key migrations:0001_initial.py— initial models for Product/Category.0002_product_catalog_pro_categor_7c1c1f_idx_and_more.py— additional indexes and constraints.0003_add_product_image.py— adds theimagefield toProduct.0004_add_name_index.py— additional name index.0005_add_trigram_index.py— createspg_trgmextension and trigram GIN indexes (PostgreSQL only).
Notes
- Run
python manage.py migrateto apply these migrations. - The
0005_add_trigram_index.pymigration is guarded so it will no-op on non-Postgres databases; for Postgres you may need permission to runCREATE EXTENSION IF NOT EXISTS pg_trgm(see the “PostgreSQL extensions and migration notes” section above).
PostgreSQL extensions and migration notes
The project includes a migration that creates the pg_trgm extension and adds trigram GIN indexes to accelerate substring/ILIKE searches on product name and description. A few important operational notes:
-
Privileges: Creating PostgreSQL extensions requires database privileges (typically a superuser or a user with CREATE EXTENSION rights). If your deployment uses a restricted DB user, the migration that attempts to
CREATE EXTENSION IF NOT EXISTS pg_trgmmay fail with a permissions error. -
Managed Postgres (RDS / Cloud SQL / etc.): Many managed services allow
CREATE EXTENSIONfor extensions likepg_trgm, but you may need to run the command as the master/superuser or enable the extension through the provider UI. Check your provider documentation. -
Recommended options to ensure success:
- Run the migration as a database superuser (temporary elevated privileges) so the extension can be created automatically by the migration.
- Or, ask your DBA to run the following SQL once against the target database before running application migrations:
CREATE EXTENSION IF NOT EXISTS pg_trgm;
-
If you cannot create extensions in your environment, the migration is safe to skip — the migration code is guarded to only attempt the extension/index creation on PostgreSQL. However, search performance will not benefit from trigram indexing in that case.
-
Verification: After running migrations on a Postgres database, verify the extension exists and the indexes are present:
-- verify extension
SELECT extname FROM pg_extension WHERE extname = 'pg_trgm';

-- verify index
\d+ catalog_product  -- look for catalog_product_trgm_idx and catalog_product_description_trgm_idx
Deployment runbook: ensure pg_trgm and run migrations
When deploying to a PostgreSQL database, ensure the pg_trgm extension is present (required by the project’s trigram GIN index migration) or run migrations with a user that has the privilege to create extensions.
Options:
1) Create the extension manually (recommended for environments with restricted DB users)
- Run as a privileged user (psql shell or provider console):
-- connect as a superuser or a user with CREATE EXTENSION privilege
CREATE EXTENSION IF NOT EXISTS pg_trgm;
- Example using psql:
PGHOST=your-db-host PGPORT=5432 PGUSER=postgres PGPASSWORD=yourpw psql -d your_db -c "CREATE EXTENSION IF NOT EXISTS pg_trgm;"
- Example using Docker (when Postgres is local in docker-compose):
# run this on the host while the postgres container is running
docker exec -i your_postgres_container psql -U postgres -d your_db -c "CREATE EXTENSION IF NOT EXISTS pg_trgm;"
2) Run migrations with an elevated DB user (simpler for automated deploys)
- Temporarily configure your deployment to use a DB user with CREATE EXTENSION privilege (or the master/superuser) and run:
python manage.py migrate --noinput
- After migrations succeed, revert to a restricted DB user for runtime if desired.
Verification
- Confirm extension exists:
SELECT extname FROM pg_extension WHERE extname = 'pg_trgm';
- Confirm indexes exist:
\d+ catalog_product
# or
SELECT indexname FROM pg_indexes WHERE tablename = 'catalog_product';
Notes
- Managed Postgres offerings (RDS, Cloud SQL, etc.) often allow enabling common extensions via their UI or require running
CREATE EXTENSIONas the master user. Consult your provider docs. - If you cannot enable extensions, the migration will skip index creation (the migration is guarded) but search performance will not benefit from trigram indexing.